
I. What to Expect
🕘 Reading time = 10 minutes
II. Background
Smile CDR installs natively on a Mac operating system. However, if you have a Windows computer you will need to install Docker, which will provide a container environment for you to run your instance of Smile CDR within. Note that if you’re a Mac user, you may also install Docker and run Smile CDR from a container. However Mac users also have the option of installing and running Smile CDR natively.
Important update: Docker now requires licenses for their product. Before installing, please reach out to your organization for a Docker license.
III. Objective
The objective of this document is to install Docker on your Windows operating system, so that you can proceed with the installation of Smile CDR.
IV. Prerequisites
There are no prerequisites for this document.
V. Instructions
-
Let’s download Docker!
Open the following https://www.docker.com/
-
Scroll to the bottom of the web page and click on “container runtime.”
-
Scroll down to “Download Docker Engine” and click on the blue box.
-
You will be brought to a page with various Docker installation options. Make sure to select the filters “desktop” and “Windows” on the left hand side of the page, then click on the “Docker Desktop for Windows” option.
-
Select “Get Docker Desktop.” Docker will then begin downloading. Once finished, double click on the downloaded file to open it.
-
This process may prompt you to make changes to your device. If this pop up appears, select “Yes”
-
The Docker installation guide will now appear. On the first screen, make sure to leave the configuration settings selected, then press “ok.”
-
Docker will then begin unpacking files, which will look somewhat like the image below:
-
Once finished, the following window will appear. Select “close and restart.”
-
Your computer may take a few minutes to complete the installation before rebooting. Once your computer restarts, Docker will soon reopen with their service agreement. Be sure to select the blue checkmark next to “I accept the terms.” Then select “Accept.”
-
At this point, you may receive the following message. You can select “continue” to ignore the error message.
-
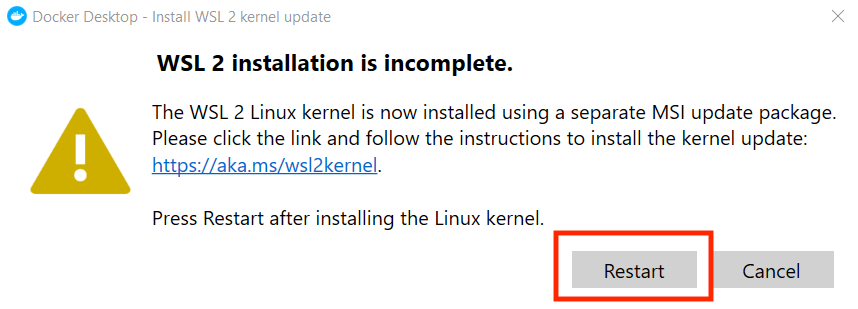
The following message may also pop-up. Click on the hyperlink to install the WSL 2 Linux kernel.
-
You’ll be taken to a page where you can download the Linux kernel update package. Click on the “Manual Install Step for Older Versions.” If this option is not available, make sure you click on the Install WSL & Update to WSL 2.
-
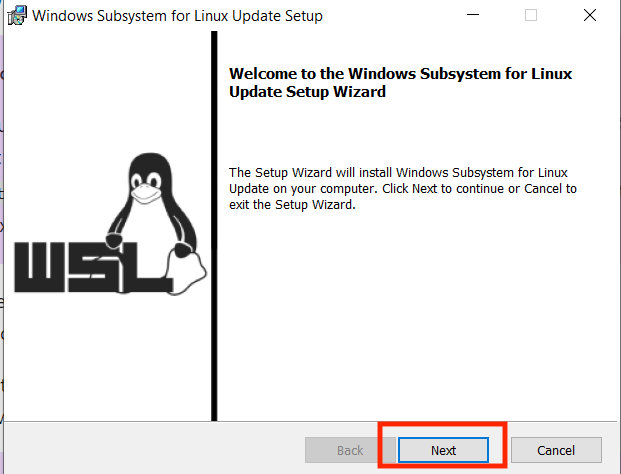
Select the blue link to download. Once the download is complete, double click to open.
-
A windows subsystem setup wizard will appear. Select “next” and then “finish.” This process may prompt you to make changes to your device, if this pop up appears, select “Yes.”
-
Now that the installation is complete, return to the message from step 12 and select “restart.”
-
Your system may once again reboot. Once docker reopens, the home page will appear as shown below. You can take a short tutorial to familiarize yourself or skip the tutorial and proceed with installing Smile CDR.
-
Voila! You’ve successfully installed Docker.


VI. Next Steps
You may now continue with the Smile CDR Installation Guide.